





Install the Via.Delivery Connector on Odoo.sh
This guide walks your Odoo.sh administrator and developer through installing the Via.Delivery Connector (technical name
Before you start, you need your Via.Delivery Client ID and Security token and read access to the Via.Delivery module repository. To get them, email info@via.delivery or book a call.
viadelivery_connector) on an Odoo.sh 19.0 project. You add it to your staging branch, test pickup checkout and order notifications there, then merge the tested code into production. For what the module does, see Via.Delivery for Odoo.Before you start, you need your Via.Delivery Client ID and Security token and read access to the Via.Delivery module repository. To get them, email info@via.delivery or book a call.
Quick start: connect your stage, test, then merge into your prod
- Client administrator, choose the project and branch: open your store's project on odoo.sh. Check your organization/repository in the top bar. Click Branches in the top navigation, then your
stagein the left sidebar under Staging. Yourprodshould be under Production. - Client administrator, create the build key: click Settings in the top navigation, scroll down to the Submodules section, and enter
git@github.com:via-delivery/odoo.gitin its Git URL field. Click Add to the right of that field. Copy the generated Public key, send it to Via.Delivery with your project name and URL, and wait for access confirmation. See section 2 for the complete steps. - Your developer, add the code: complete section 3 in a local clone of your store's repository, selecting the approved release from Via.Delivery's
prodbranch. This Git step is required for the private repository. The Submodule → Run on Odoo.sh control on the branch page is for public repositories; use the Git commands in section 3 for this installation. - Your Odoo.sh → Branches → stage: wait for the new build to succeed, then use Connect to open your staging database.
- Your staging Odoo → Apps: enable developer mode, update the Apps List, find Via.Delivery Connector, and select Install / Activate.
- Your staging Odoo → Via.Delivery → Settings: choose your company, set Status → Limited, select which orders to send, enter your test Client ID / Security token, and Save. Check that Local Pickup Point is available on your website.
- Your staging website: place a test order with a physical product and a complete home address, select Local Pickup Point, and complete a test payment. Check the pickup address, price and billing address. In Via.Delivery → Order queue, send the test event with Send now and confirm receipt with Via.Delivery. Set Status → Active and repeat checkout as an ordinary customer.
- Your Odoo.sh → prod → Backups: create or verify a current production backup, including the database and filestore. Review all changes that would be merged from your
stage. - Your Odoo.sh → Branches: drag your
stageonto yourprodto merge and deploy the tested code. Keep the same tested Via.Delivery commit. If your repository requires pull requests, merge a pull request from yourstageinto yourprodinstead. - Your production Odoo: install the app in this database, enter your live credentials and chosen order filter, check the scheduled sender, and set Status → Active. Place an agreed verification order and confirm receipt in Via.Delivery. Settings entered in staging are not transferred by a Git merge.
1. Before you begin
This guide is for your Odoo.sh 19.0 project. The application is Via.Delivery Connector; its technical module name is
viadelivery_connector. Installation requires:- The Admin role in your Odoo.sh project and administrator access to your Odoo database. These are separate permissions.
- A developer who can commit changes to your project repository, directly or through a pull request.
- Read access to the external Via.Delivery repository for both your Odoo.sh builds and your developer's computer.
- Your Via.Delivery Client ID and Security token, with test credentials agreed for staging.
- A working website checkout with a physical product and a test payment method.
stage for your testing branch and prod for your production branch. Replace these names if your project uses different ones.| Item | Value |
|---|---|
| Your repository | The Git repository already connected to your Odoo.sh project |
| Your testing branch | stage |
| Your production branch | prod |
| External module source | git@github.com:via-delivery/odoo.git |
| Branch in the external source | prod |
| Module location in your repository | vendor/viadelivery/viadelivery_connector |
Your
stage will contain a Git submodule referencing a specific commit from Via.Delivery's prod branch. Changes published by Via.Delivery do not automatically change that saved commit in your project.Who completes each step
| Who | Action | Ready to continue when |
|---|---|---|
| Your Odoo.sh administrator | Generate the build key in section 2 and send it to Via.Delivery | Via.Delivery has received the complete public key for your project |
| Via.Delivery | Register your build key, arrange your developer's separate read access, and supply the approved release commit | Via.Delivery confirms access and supplies the release hash |
| Your developer | Add and commit the submodule in your store's repository using section 3 | The change is merged/pushed to your stage and its Odoo.sh build succeeds |
| Your Odoo administrator | Install, configure and test the app using sections 4 to 6 | The test order is received by Via.Delivery |
Find the right controls in Odoo.sh
| Control | Where it is | Use in this installation |
|---|---|---|
| Project Settings | Top navigation, next to Branches, Builds, Status and Audit Logs | Open this page to generate the build key |
| Submodules | A section further down the project Settings page, below GitHub key and webhook | Enter the Via.Delivery Git URL and click Add |
| Branch SETTINGS | Tab below the selected branch name, next to HISTORY, LOGS and TOOLS | Branch configuration; the build-key field is on the project Settings page above |
| Branch Submodule | Upper-right toolbar, next to Clone, Fork, Merge, SSH and SQL | Shows a command and Run on Odoo.sh; this guide uses local Git for the private repository |
2. Arrange access with Via.Delivery
Your Odoo.sh build access
Complete these steps once for your store's Odoo.sh project:
Via.Delivery registers the key in its own repository. You do the Odoo.sh steps in your project; you don't need administrative access to Via.Delivery's GitHub settings. See Odoo.sh private-repository settings.
- Open your project on odoo.sh. Check that the organization/repository shown in the top bar belongs to your store.
- Click Settings in the top navigation bar, next to Branches, Builds, Status and Audit Logs. The page address ends in
/project/YOUR_PROJECT/settings. If this page is unavailable, ask your project's Odoo.sh administrator to complete this step; project settings require the Admin role. - Scroll down past GitHub key and webhook to the heading Submodules. The section contains a yellow notice about private repositories, followed by a Git URL field and an Add button.
- In that field, enter exactly
git@github.com:via-delivery/odoo.git. The examplegit@github.com:acme/mii-theme.gitshown in the empty field is a placeholder; use the Via.Delivery address. - If
git@github.com:via-delivery/odoo.gitalready has an entry in this section, copy its complete Public key. Otherwise, click Add, immediately to the right of the field, and copy the complete Public key from the new entry for this repository. - Send the public key to your Via.Delivery contact, together with your company/project name and Odoo.sh project URL. Identify it as your Odoo.sh build key.
- Via.Delivery adds this key to its GitHub repository as a read-only deploy key. Wait for confirmation and ask for the approved release commit hash from Via.Delivery's
prodbranch.
Via.Delivery registers the key in its own repository. You do the Odoo.sh steps in your project; you don't need administrative access to Via.Delivery's GitHub settings. See Odoo.sh private-repository settings.
Your developer's computer
The Odoo.sh build key authorizes Odoo.sh only. For the Git commands in section 3, ask Via.Delivery to also give your developer's GitHub account read access to the external repository, or to register a separate public SSH key generated by your developer. Accept any repository invitation before running the commands.
Keep private SSH keys on the systems that generated them. Share public keys only. Your Client ID / Security token are credentials for the Via.Delivery service and are entered in Odoo later; they do not grant Git access.
GitHub deploy keys authorize repository access. The
Keep private SSH keys on the systems that generated them. Share public keys only. Your Client ID / Security token are credentials for the Via.Delivery service and are entered in Odoo later; they do not grant Git access.
GitHub deploy keys authorize repository access. The
prod branch is selected separately when adding the submodule. See GitHub deploy keys.3. Add the external module to your stage
Your developer completes this section. Use a terminal on the developer's computer, in a local clone of your store's project repository.
In Odoo.sh, click Branches in the top navigation and select your
The commands assume that your testing branch already exists, your working copy has no uncommitted changes, and
First, check your developer's access to the external release branch:
origin in the commands below means your store's repository. Have the approved release commit hash from Via.Delivery ready.In Odoo.sh, click Branches in the top navigation and select your
stage in the left sidebar under Staging. If your store uses another testing branch name, use that name instead of stage in the commands below. If there is no staging branch, have your project administrator prepare one before continuing.The commands assume that your testing branch already exists, your working copy has no uncommitted changes, and
vendor/viadelivery is not already in use. If the submodule already exists, have your developer review its configured release instead of adding it again.First, check your developer's access to the external release branch:
git ls-remote git@github.com:via-delivery/odoo.git refs/heads/prodThe result should include a commit hash followed by
If your developer does not have a local copy of your project, replace
refs/heads/prod.If your developer does not have a local copy of your project, replace
YOUR_PROJECT_SSH_URL with your repository's SSH URL:git clone --branch stage --recurse-submodules YOUR_PROJECT_SSH_URL customer-project
cd customer-projectIn your project directory, select and update your testing branch:
git switch stage
git pull --ff-only origin stage
If your
stage is protected against direct pushes, create a working branch now:git switch -c add-viadeliveryAdd the external repository, using its
prod branch:git submodule add -b prod git@github.com:via-delivery/odoo.git vendor/viadeliveryReplace
APPROVED_RELEASE_COMMIT below with the commit hash supplied by Via.Delivery from its prod branch. Then select that release and record its hash:git -C vendor/viadelivery checkout --detach APPROVED_RELEASE_COMMIT
git -C vendor/viadelivery rev-parse HEAD
git add .gitmodules vendor/viadelivery
git diff --cached --submodule=logYour
.gitmodules should contain this entry, next to any other submodules you already use:[submodule "vendor/viadelivery"]
path = vendor/viadelivery
url = git@github.com:via-delivery/odoo.git
branch = prodThe
Review the changes, then commit them in your repository:
branch = prod entry identifies the external release branch; your project commit pins the selected release hash. A detached HEAD inside vendor/viadelivery is expected.Review the changes, then commit them in your repository:
git commit -m "Install Via.Delivery Connector"If you are working directly on your
stage, push it:git push origin stageIf you are using the working branch, push that branch instead and merge a pull request into your
stage:git push -u origin add-viadeliveryReturn to odoo.sh, click Branches in the top navigation, and select your
stage under Staging in the left sidebar. Wait for the build containing your new commit to succeed, then use Connect for that build to open the staging database. Odoo.sh finds the addon inside the submodule. The repository structure will include:your-project/
├── .gitmodules
└── vendor/
└── viadelivery/
└── viadelivery_connector/
└── __manifest__.pyResult: the selected Via.Delivery release is saved in your store's
stage, and Odoo.sh can build it. Continue with section 4 to install the app in the staging database.4. Install the app in your staging database
- Log in to your staging Odoo as an administrator.
- In Settings, activate developer mode.
- Open Apps → Update Apps List → Update.
- Search for Via.Delivery Connector (
viadelivery_connector). - Click Install / Activate. Odoo installs the
website_saleandstock_deliverydependencies automatically. - Check that Via.Delivery → Settings and Via.Delivery → Order queue are available.
5. Configure your account and checkout
Select your store's company in Odoo, then open Via.Delivery → Settings. These settings are stored separately for each company.
Before saving credentials in a staging copy, review Order queue, the receiver URL and which orders will be sent. A database copy may contain production integration settings and queued events. Use the test credentials and receiver agreed with Via.Delivery. Saving complete credentials can allow queued events to be sent; Send now also sends a real HTTP request.
Before saving credentials in a staging copy, review Order queue, the receiver URL and which orders will be sent. A database copy may contain production integration settings and queued events. Use the test credentials and receiver agreed with Via.Delivery. Saving complete credentials can allow queued events to be sent; Send now also sends a real HTTP request.
Account and availability
| Setting | What to enter or select |
|---|---|
| Client ID | Your Via.Delivery dealer_id |
| Security token | Your Via.Delivery dealer_token; masked in the interface |
| Status → Limited | Use for initial testing: pickup is available to website administrators, including system administrators |
| Status → Active | Pickup is available to all customers; the default status |
| Status → Disabled | Pickup is hidden from all customers |
For the initial test, select Limited, enter your test credentials and configure the order notifications below, then Save. To offer pickup to customers after testing, select Active and save again.
Status controls pickup availability. Order notifications and queued events work independently of Status, including when pickup is Disabled.
Open Inventory → Configuration → Delivery Methods → Local Pickup Point. Check that the provider is Via.Delivery, the method is published on your website, and its company, website and destination restrictions allow your intended customers to use it. Your company's Client ID in Via.Delivery settings is used for pickup lookup.
Status controls pickup availability. Order notifications and queued events work independently of Status, including when pickup is Disabled.
Open Inventory → Configuration → Delivery Methods → Local Pickup Point. Check that the provider is Via.Delivery, the method is published on your website, and its company, website and destination restrictions allow your intended customers to use it. Your company's Client ID in Via.Delivery settings is used for pickup lookup.
Order notifications
| Setting | Recommended configuration |
|---|---|
| Order webhook URL | Keep https://odoo.viadelivery.pro/hook/order unless your Via.Delivery contact supplies a different receiver |
| Only orders with Via.Delivery shipping method | Off by default: sends all new confirmed website orders for your company, including other delivery methods. Turn it on to send only orders using Via.Delivery shipping. Keep it off if your agreed service requires all website orders |
| Signature secret (optional) | Leave empty unless your receiver requires a separately agreed signing key; the Security token is used by default |
Click Save after making changes. Credentials are added to notifications automatically; you do not need to put them in the webhook URL.
The shipping filter applies when a new website order is confirmed. Changing it does not remove existing queued events or export older orders. Manually created orders without a website association are outside this export scope. An order confirmation is separate from successful payment; later payment changes are sent as separate notifications.
Pickup lookup sends the customer's home address and available order characteristics to Via.Delivery. Order notifications contain customer contact and address details, products, amounts and payment information. If you enable the map, the widget receives the Client ID, address and available order parameters. Account for these data transfers in your store's configuration and customer information.
The shipping filter applies when a new website order is confirmed. Changing it does not remove existing queued events or export older orders. Manually created orders without a website association are outside this export scope. An order confirmation is separate from successful payment; later payment changes are sent as separate notifications.
Pickup lookup sends the customer's home address and available order characteristics to Via.Delivery. Order notifications contain customer contact and address details, products, amounts and payment information. If you enable the map, the widget receives the Client ID, address and available order parameters. Account for these data transfers in your store's configuration and customer information.
Additional settings: checkout appearance
You can keep the default appearance for the initial installation. Expand Additional settings to customize it:
| Setting | Purpose |
|---|---|
| Pickup radio HTML template | Applies the inline style of the first input type="radio" to the pickup selector |
| Pickup point HTML template | Controls each location card; available placeholders are listed below the field, including {{name}}, {{address}}, {{delivery_estimate}} and {{price_label}} |
| Pickup separator HTML template | Controls the separator between location cards |
| Show Google maps | Enables Show on Map and pickup selection through the Via.Maps widget; off by default |
Template previews use sample data and update while you edit. Empty template fields use the defaults. Save your settings to apply changes to checkout.
6. Verify your staging installation
- As a website administrator while Status is Limited, add a physical product to your staging website cart.
- Enter a complete home address: street, city, ZIP/postal code and country.
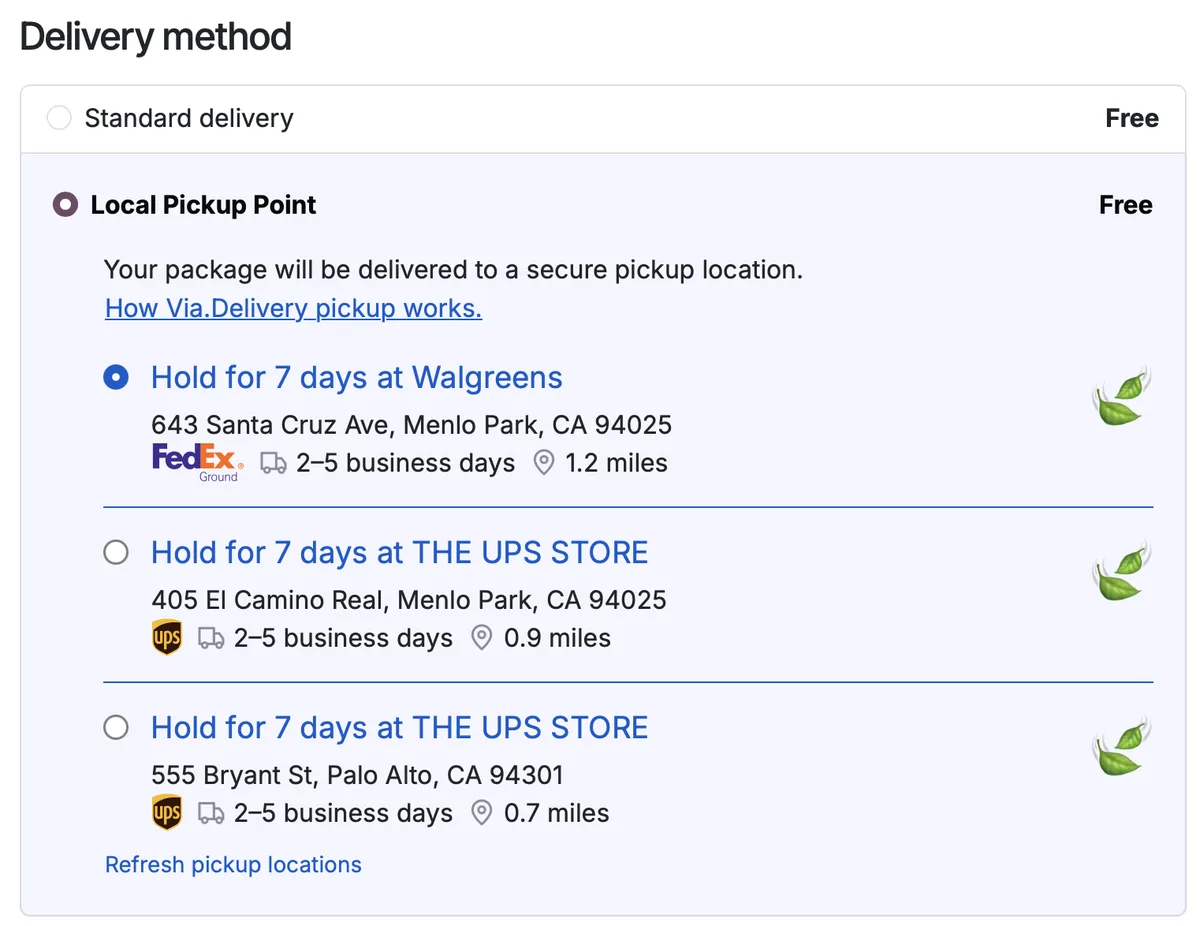
- Select Local Pickup Point. Up to three nearby locations should appear, with the first selected automatically. Check the location, delivery price and estimate.
- Select another location. If you enabled the map, open Show on Map and check selection there too.
- Complete checkout using your test payment method.
- Open the confirmed sales order. The shipping address should be the selected pickup location; the billing address should remain the customer's address.
- Open Via.Delivery → Order queue and find the test order's event. Review Delivery status, State, Attempts and Last error.
- Use Send now to make an immediate delivery attempt. Check for Delivered, then confirm with Via.Delivery that the test order was received, using its Event ID.
- Set Status → Active, save, and repeat checkout as an ordinary customer before approving the release.
Delivered means the receiver accepted the HTTP event. Check that the order also appears in Via.Delivery. The installed module provides pickup selection and order notifications; shipment processing and label printing are handled separately in your Via.Delivery service.
7. Merge your tested stage into your prod
- Confirm that your staging checks passed, including notification receipt by Via.Delivery.
- In your Odoo.sh production branch → Backups, create or verify an up-to-date database and filestore backup.
- Review the changes between your
stageand yourprod. A merge includes all changes between those branches, so confirm the intended release scope with your developer. - In your Odoo.sh → Branches, drag your
stagebranch onto yourprodbranch to merge and deploy. If your repository uses protected branches, follow your pull request process fromstageintoprodinstead. - Keep the same
.gitmodulesentry and Via.Delivery submodule commit that you tested. Fetching a newer commit from the external source during this step would change the version being released. - Wait for your production build to succeed, click Connect, then install Via.Delivery Connector in your production database through Apps.
- Select each intended company and enter your live Via.Delivery credentials, receiver URL and order filter. Review the existing queue before saving. Staging database settings are not transferred through Git.
- Check the scheduled action Via.Delivery: send order events, select Status → Active, and save.
- Place an agreed production verification order and check the shipping address, billing address and notification receipt in Via.Delivery.
8. If a check fails
| Problem | Check in your system |
|---|---|
| Cannot find the Git URL field or Add button | Use Settings in the top project navigation, then scroll to Submodules. Ask an Odoo.sh project Admin if project Settings is unavailable |
| Public key was created, but the app is missing | Complete the Git steps in section 3, wait for the new staging build, then install the app using section 4 |
| Odoo.sh cannot fetch the module | Confirm that Via.Delivery registered your Odoo.sh public key and that .gitmodules uses the correct external SSH URL |
| Your developer cannot read the external repository | Check the developer's separate repository access, accepted invitation and SSH identity |
| App is missing from Apps | Open the correct build/database, update the Apps List, and confirm that the submodule contains viadelivery_connector/__manifest__.py |
| Via.Delivery menu is missing | Check that the app is installed in this database and your user has system administrator rights |
| Local Pickup Point is hidden | Check Status, website administrator rights when Limited, the delivery method's publication and restrictions, and a physical product in the cart |
| No pickup locations are returned | Check your company's Client ID, the complete home address and service availability with Via.Delivery |
| Notification stays Pending | Read Delivery status; check credentials, receiver URL, earlier events for the same order and the scheduled action; use Send now for a direct test |
| HTTP 401 / 403 | Check the configured credentials and receiver URL with your Via.Delivery contact |
| No event for a confirmed order | Check the active company, list filters, website association, shipping filter and whether the order was confirmed after installation |
Failed notifications stay queued for automatic retries when the scheduler runs. Retry on next run requests another scheduled attempt; Send now attempts delivery immediately. Correcting and saving changed credentials or the receiver URL makes pending events eligible for another attempt once all required settings are present.
Contact support
Email info@via.delivery with your Odoo and module version, environment, selected release commit, order reference, Event ID and error text. In your Odoo.sh → Logs → odoo.log, search for
Via.Delivery and the order reference. Keep Security tokens out of support messages and screenshots.